Showing posts with label DIY. Show all posts

Saturday, June 30, 2012

ADD IT TO THE LIST........


My list this summer just keeps on going and going, page after page. Even though everyday I work on it. I thought about it this morning - maybe if I stop going on Pinterest for just awhile I could catch up{insert long pause}  ....I will just have to get more paper. Here is a peak at my latest "Must Do" ideas.


This ones for the Kiddos........


Can it get any more adorable than this? Ashley + Jamin of The Handmade Home created this for their kids. They give step by step instructions plus a cost break down. I Love the fact that everything she does is on a budget and loaded with creativity! The best part of this fort/hideaway {no trees needed} Our newish backyard {8yrs old} can barley hold a bird house, so this is Perfect.


Head on over an see the details for yourself .....HERE


Wednesday, March 28, 2012

Baby Gifts {part2}


If you do not have the option of making a custom screen and really unless you plan on selling these there is no need to bother...just use the freezer method.

Here’s what you need:
:: white onesie
:: freezer paper
:: craft knife
:: iron
:: fabric paint or {acrylic paint mixed with textile medium}
:: foam brush
:: scrap piece of cardboard

                       Here's what to do:

STEP 1 - Place a piece of freezer paper, shiny side down, over the top of your print out, and trace the letter {image} onto the back of the freezer paper. 

STEP 2 - Use a craft knife to cut out the letter. If your monogram has floating inner pieces{such as O, A, B} be sure to hang onto those pieces that you’ll need to complete the stencil. Although you can reuse your monogram print out, you will need one freezer paper stencil for each towel you wish to make.


STEP 3 - Once your freezer-paper stencil is cut out, apply it to the Onesie. Align the stencil, shiny side down, at the center of one edge and iron into place. The heat from the iron will cause the plastic coating on the freezer paper to stick, sealing the edges to create a nice, crisp stencil line.set your iron to the hottest setting w/o steam. Do not move your iron around just hold with firm pressure(30 seconds) ...if you need to move over to cover the whole piece lift and set down carefully.


STEP 4 - Before painting, place a scrap piece of cardboard behind the fabric to catch any paint that might soak through. Using a foam brush dab on screen printing ink like speedball or fabric paint, you can use regular acrylic paint mixed with textile medium to paint . Covering the letter completely. Let paint dry. (A fan or blow dryer can speed up the drying time if you’re in a hurry!) Carefully peel off the freezer paper. { I never wait I always lift mine immediately .....just don't blame me if you try this and it doesn't work - never had a mistake}


STEP 5 - Once your paint is dry you want to set your image {this helps it to last longer and from fading wash after wash} With your iron set on high no steam again hold in place for 30 sec or so making sure to get every spot.

              ******* SOME MORE INSPIRATIONS **************


Tuesday, March 20, 2012

Baby Gifts {part 1}......


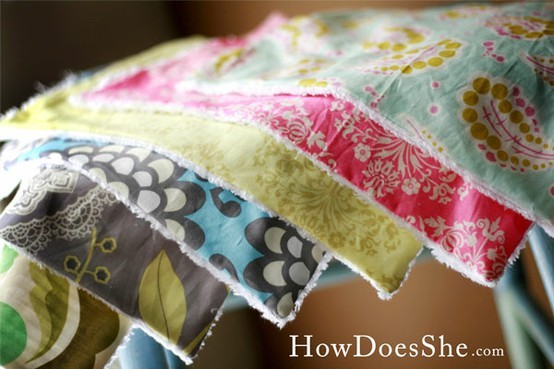
I needed some  cute and quick baby gifts for several friends recently {it must be in the water}  after seeing the tutorial by How Does She I came up with some burp cloths and a custom screen printed onesie.

Here are the incredibly easy and basic instructions:


-Get your hands on some fabric you love. Fabric.com  -You will be amazed at how many burp cloths you can make with a yard or two of fabric.

-For the back I used a  white terrrycloth {towel} fabric but you can use Chenille. 

-Cut your rectangle. Whatever size. Mine were 10 x 18rectangles some people prefer 9×14.....{I like them a little bigger}

-Place the front of the chenille and front of the patterned material together and pin {so it looks inside out}.

-Sew all the way around all four sides, leaving appx 2 inches un-sewn.
-Use the 2″ hole to flip your fabric right sides out.

-Tuck your rough edges in the  hole pin and run a stich around the outside perimeter of the rectangle.

-Vwalah! Pair them together and you got an incredibly adorable gift.

M is for MIA

 I made a screen and hand printed the onesie .....you can always use freezer paper{ DIY post this week}


Thursday, September 8, 2011

Updated Dresser

 I finally decided to give some attention to some much needed rooms in our home. I can say I am satisfied with almost every room in our home except ...THE KIDS BEDROOMS....I would be so embarrassed for any to know I was a designer if they new what my children's rooms looked like!

My inspiration photo for my son's room


We started with this FREE find at a home we were remodeling. They homeowners gave us this after I maybe.... mentioned it once or twice that I really liked it.


Our fabulous FREE find!


At first We thought White Lacquered or Dark chocolate. My husband and son voted Dark chocolate. SO I went and bought the paint for it, but as usual I changed my mind half-way through the project.

Here is what I did..........


 Supplies needed for this project:

Drop Cloth
320 grit sandpaper
old cloth (3)
Wood stain
White spray Primer ( 3 cans for ours)
Grey spray primer (3 cans)
Pencil
STEP 1: We started by numbering the drawers as we took them out. *Sometimes with older furniture the drawers only fit where they belong and I hate puzzling them after, so I took this extra step.(with pencil write on the bottom TOP Right or Right 1 and so on)

STEP 2:Lay everything on your drop cloth. Next with your old cloth clean any dust and dirt from all surfaces, let dry and with your sand paper give it a light sanding.


STEP 3: You are ready to apply the first coat of white primer......let dry 2-4 hours before applying a second coat.Let your second coat dry for 24 hours.


Step 4: Now you are ready to apply 2 coats of grey primer, allow 2 to 4 hours dry time in between coats. Wait 24 hours for next step.

Step 5: With your sandpaper, sand off softly a few layers of grey primer... depending on how much white you want to see. I barley sanded mine just enough to give it a softer grey finish and to smooth out the look. You need to use your old cloth here - it gets very messy and you must keep wiping off the grey primer dust as you go.


This is where I changed my mind..I really liked the look of the grey primer...... which I bought after the white primer(?) thinking it might help when I applied the Dark chocolate paint. Are you still following me? I often do things backwards:)


Step 6: Once you reached your desired look, you are ready to apply a stain I used Dark Walnut. Carefully load a small amount of stain on a clean old cloth and wipe in one motion all over your painted surfaces.

I chose not to seal my dresser..."if" it gets scuffed, it will only add character to it as it ages. Or..... I might change my mind and who once to strip furniture? NOT ME!

Let it dry completely and you are ready to re- assemble.


 What do you think? I will show you the rest of the room makeover soon!


Thursday, August 11, 2011

FREE PRINTABLES

Here are some free printables for TODAY.... download and print any of these and visit the sites! ENJOY:) click the links under the pictures
Print and add your own list(prints blank) Here  JONES DESIGN COMPANY
Click and print
Birthday Calendars - keep 1 with your master calendar and 1 with your cards & stationary PRINT HERE
I love this Chart and use it myself....try laminating one for each child.

PRINT HERE
Print out these here for "FIRST DAY OF SCHOOL" photo traditions.  Pre-k to 12th grade.
Gift tags for any occasion -  click on image or here

Tuesday, July 26, 2011

Cheap Chalboard Labels


Chalkboard and Vinyl Labels With The Cricut 

I might be the only one still obsessed with anything chalkboard....if you're like me and still have not gotten around to making labels....good news! Here is a cheaper tutorial I found:


DSC_0312 

DSC_0301
Cutting vinyl with a Cricut is no new news.  But here is her secret: you do not have to buy expensive vinyl in order to make chalkboard labels {or any other vinyl project like this drink bucket}.  

DSC_0292  You can buy black contact paper.  And it works just the same.  And you get a whole roll of it for the same price as two pieces of vinyl. 
DSC_0284Cut it to size and tape it onto your cutting mat {so it stays in place}.  To use as a chalkboard, write on it (I recommend chalkboard pens}, and wipe off with a damp towel.  Easy peasy.  No more expensive vinyl!
 SOURCE

If you do not have a cricut machine....do not fear.

Things you’ll need:
Chalkboard paper
Shape to cut
Pencil
Craft Knife and cutting mat
Chalkboard pen


Things to do:
1. Decide on the shape you are looking for. You can cut tags, circles or flourishes. Trace the shape onto the chalkboard paper with the pencil or find an appropriate die for your needs.
Chalkboard Labels2 Chalkboard Labels


2. Cut the shape out carefully, being sure the edges are smooth.
3. Peel off and apply to your surface. This is a great way to label cups for a party, identify the contents of a bin or add some flare to a simple notebook.


Chalkboard Labels3 Chalkboard Labels
   SOURCE


Here are a few more inspirations to help kick start your project


                                               CL. Chalkboard Labels (variety) - set of 18