Friday, April 13, 2012

Weekly Drive-by


This weeks drive-by line up


Designer Hampton Estate


$14 Million Barberrys Mill Neck, NY tour

$8 Million New Cannon Connecticut Home tour

$49 Million Hampton Home tour


Take a tour.... and let me know which one you would pick?


Tuesday, April 10, 2012

WING BACK STYLE

One of my currant projects is to decide on a fabric for a set of wing back chairs I inherited. I was almost certain I knew what I wanted but the more I look ......we'll let's say I need a little more time to convince myself " I'm sure I know what I want" 

Which one would you do? Here's the list {in no particular order}


1.
covered in Brazilian coffee sacks
2.
bright and bold fabric
3.
large bold stripes
4.
crisp chevron print
5.
large scale pattern
6.
classic linen and nail heads
7.
casual and understated


So were you able to pick a favorite?


WHICH ONE?


Friday, April 6, 2012

HAPPY EASTER

                   IMAGE OF THE DAY


Wednesday, March 28, 2012

Baby Gifts {part2}


If you do not have the option of making a custom screen and really unless you plan on selling these there is no need to bother...just use the freezer method.

Here’s what you need:
:: white onesie
:: freezer paper
:: craft knife
:: iron
:: fabric paint or {acrylic paint mixed with textile medium}
:: foam brush
:: scrap piece of cardboard

                       Here's what to do:

STEP 1 - Place a piece of freezer paper, shiny side down, over the top of your print out, and trace the letter {image} onto the back of the freezer paper. 

STEP 2 - Use a craft knife to cut out the letter. If your monogram has floating inner pieces{such as O, A, B} be sure to hang onto those pieces that you’ll need to complete the stencil. Although you can reuse your monogram print out, you will need one freezer paper stencil for each towel you wish to make.


STEP 3 - Once your freezer-paper stencil is cut out, apply it to the Onesie. Align the stencil, shiny side down, at the center of one edge and iron into place. The heat from the iron will cause the plastic coating on the freezer paper to stick, sealing the edges to create a nice, crisp stencil line.set your iron to the hottest setting w/o steam. Do not move your iron around just hold with firm pressure(30 seconds) ...if you need to move over to cover the whole piece lift and set down carefully.


STEP 4 - Before painting, place a scrap piece of cardboard behind the fabric to catch any paint that might soak through. Using a foam brush dab on screen printing ink like speedball or fabric paint, you can use regular acrylic paint mixed with textile medium to paint . Covering the letter completely. Let paint dry. (A fan or blow dryer can speed up the drying time if you’re in a hurry!) Carefully peel off the freezer paper. { I never wait I always lift mine immediately .....just don't blame me if you try this and it doesn't work - never had a mistake}


STEP 5 - Once your paint is dry you want to set your image {this helps it to last longer and from fading wash after wash} With your iron set on high no steam again hold in place for 30 sec or so making sure to get every spot.

              ******* SOME MORE INSPIRATIONS **************


Tuesday, March 20, 2012

Baby Gifts {part 1}......


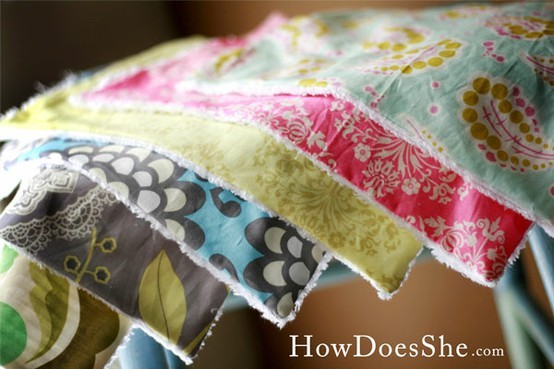
I needed some  cute and quick baby gifts for several friends recently {it must be in the water}  after seeing the tutorial by How Does She I came up with some burp cloths and a custom screen printed onesie.

Here are the incredibly easy and basic instructions:


-Get your hands on some fabric you love. Fabric.com  -You will be amazed at how many burp cloths you can make with a yard or two of fabric.

-For the back I used a  white terrrycloth {towel} fabric but you can use Chenille. 

-Cut your rectangle. Whatever size. Mine were 10 x 18rectangles some people prefer 9×14.....{I like them a little bigger}

-Place the front of the chenille and front of the patterned material together and pin {so it looks inside out}.

-Sew all the way around all four sides, leaving appx 2 inches un-sewn.
-Use the 2″ hole to flip your fabric right sides out.

-Tuck your rough edges in the  hole pin and run a stich around the outside perimeter of the rectangle.

-Vwalah! Pair them together and you got an incredibly adorable gift.

M is for MIA

 I made a screen and hand printed the onesie .....you can always use freezer paper{ DIY post this week}


Friday, March 16, 2012

Hardly Houswives Feature & Giveaway

I am such a sucker for a giveaway I will enter almost anything.......I almost never win........but maybe you have better luck than I do! I'm giving away a set of Modern Paisley towels to the readers of Hardly Housewives a wonderful blog written by to  friends, Caitlin & Jaisa  who share recipes, crafts and adventures in a hip way.

Check out the post here and follow the instructions to enter....


Tuesday, March 13, 2012

Image Of The Day.......

Headed off to buy some salvaged shutters I found online today for something like this.


Tuesday, March 6, 2012

Casa Kulanu {Napa Valley}....


                                                                            source found here